Saturday, January 28, 2012

Midnight Marzipan

Late last night along with good friends I whipped up some delicious Martha Stewart muffins.
They are Carrot Ginger Spice, with Vanilla Bean Cream Cheese frosting. Topped with the cutest almond paste (like marzipan) carrots that my friend Stephanie (mostly) and I sculpted.


They didn't make it to the frosting stage till this afternoon. Not that they needed frosting, but Mr. B requested it, and I have a hard time saying no to him, and frosting.


The carrots are just almond paste tinted with a touch of gel food coloring, then shaped into "organic" carrots, dusted with cocoa powder for the earthy look and topped with parsley and mint sprigs.


Most of Stephanie's carrots were so darling and had such character. This is probably the sweetest and my favorite, "lovers embrace".


Recipe from Martha Stewart Baking book, but also found here.

I substituted the buttermilk for whole milk with a tsp of vinegar, because I didn't have any buttermilk. I also added about 3 cubes of candied ginger chopped finely to the batter.
The frosting I made was a simple cream cheese frosting with vanilla bean added to it. I think orange would be lovely though!


Enjoy!


Saturday, January 21, 2012

Finally bedroom furniture!

The reason for the above mentioned "finally" is that I had ordered new bedroom furniture back on....Labor Day, from an online store that (long story short) went out of business. So I had to re-order the furniture from a real store after Christmas, and we got it in a month. Yay for real stores!

We did have perfectly usable solid wood furniture that was given to Mr. B many, many years ago. Shown below the oak nightstands that clearly did not match the darker wood bed that we bought 2 1/2 years ago when we moved into our new home.
Before


It's been doing the job, but driving me a little bonkers, also it wasn't enough drawer space for all of our clothing.
Our closets are super tiny and we have a lot of knitted goods (as you can imagine) and small things (unmentionables) that were being crammed into 3 drawers between the two of us.


This is our Kindcaid USA made, solid wood bedroom set :)
It's a beautiful distressed dark wood finish, that just happens to match our Costco bed just perfectly. The style is called Stonewater.
After


Oh what's that in the corner you say? Oh that's my new Lingerie Chest, it rocks.
I didn't think I could love a piece of functional furniture this much, but it has turned my crammed, socks, hats, scarves, underthings, & even jewelery into a perfectly organized and well kept goodies. I smile every time I open it.


It fits well in the corner of the room by my side of the bed. I was worried it would look crammed in, but it really goes nicely in that corner. Now I think it would empty without it.


This is our new dresser, or what the furniture company calls a "Drawer Chest". Its mostly for Mr. B (I got one drawer) and our TV. The size difference from our old armoire is major. This dresser although it holds more clothing it's substantially smaller, therefore makes our room feel larger.


I will feel a bit more at ease walking my way into the bathroom in the middle of the night now. I won't have to worry about my toes as much with this little lady.


We moved the old oak nightstands and armoire into our guest room where the long dresser that goes with the set has been all along. Now its a nicely matching and functional set for our guests.


Here is the new stuff one more time all together, just for me. I can't believe we actually got it after 4 months of waiting. It was totally worth it.


Saturday, January 14, 2012

Solo updates around here

I woke up this morning with a plan, a plan to fix a few things that were just not right around here. Two problem areas to be exact.
1.) Our Utility closet disaster area.
2.) The Guest Bath broken towel holder in the tub. (yeah I know, I'll explain below)

Normally I involve Mr. B in these plans, well lets be frank, he usually does the majority of the work as I take on all creative control.
This time I was working solo. Mr. B has been tied up rebuilding a vehicle in our garage and that's a top priority. While I had elaborate ideas of how perfect my 2 projects could be in my head, I set out to town for supplies I quickly realized something.
I could fix them the easy way, or the time consuming and expensive way which happens to be the only way to achieve what my mind had made up.
Well guess what. I went cheap and easy folks, and I finished the projects in less than a couple hours and I am okay with that.

Sure they aren't quite what I wanted, but as a very smart and realistic woman once told me, "it's good 'nuff"

Project # 1. Utility closet.
Here is my very shameful and horrifying broom/utility closet, before.

Ahhhhh!!!


It's really bad, totally unorganized but very much used on a daily basis. This small cluttered closet is our broom storage, dog food closet, grocery bag hanging area, shoe storage, and it holds my rolling case full of tools and crafting supplies. Unfortunately the plan I had of turning it into a beautifully looking custom built-in storage area didn't quite make it in my budget for today.
So I turned this.


To this with a trip to the hardware store, and the local thrift store.


I paid $8.00 for this really heavy duty broom holder bracket. It keeps my long handled cleaning devices up and away from the floor, and therefore in a nicely sectioned off area in the closet. No more flopping around all over the ground.


I moved our hook rack to the back of the closet and much higher up, so it stores all of my reusable grocery bags up high, where there used to be a useless tiny shelf that I couldn't reach.


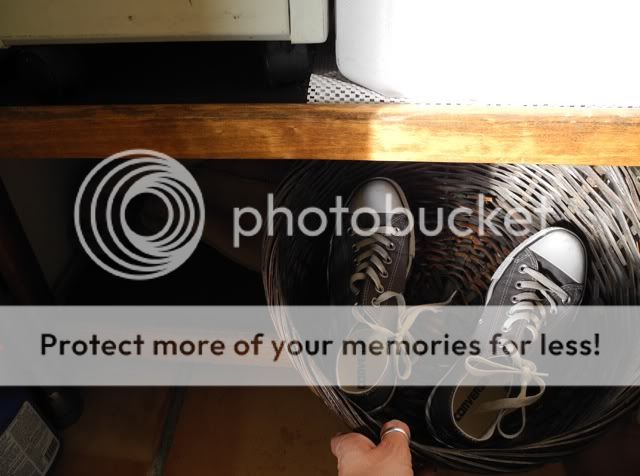
I also picked up this small wooded shelf and basket from a thrift store (that supports our local humane society) I set the rolling cart on top of it, along with Baxter's large ant proof food bin. On the bottom shelf I placed the basket that I am using to store smaller shoes and my old Ugg boots are just to the left. This is really helpful to have a place we can neatly store our "not so nice shoes" and keep them out of sight.


Not that pretty, but it's organized and it works so I'm happy.

Project # 2.
The guest bath broken towel rack tile things.
Have you ever been in a bath with a towel rack in it? No? Neither had I until we bought our home with one! The guest bathroom had a horizontal bar in it, kind of like the ones you could pull on to assist you while getting out of the bathtub, we quickly realized this was not made to hold much weight at all. So it must have been for towels? right?
Here it is broken. The bar was pulled on (over a year ago) and it snapped out breaking the two tile holders on either side.


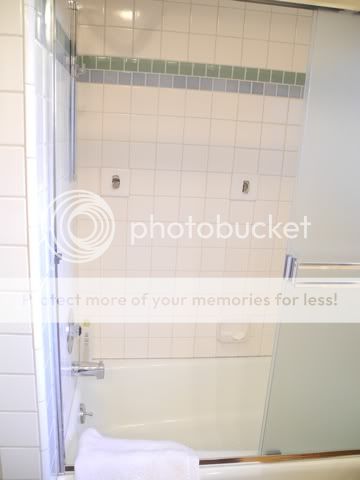
It doesn't look too bad from the front.


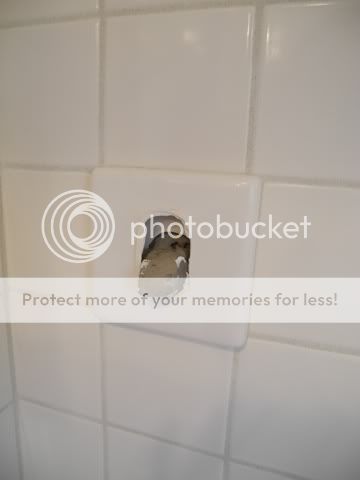
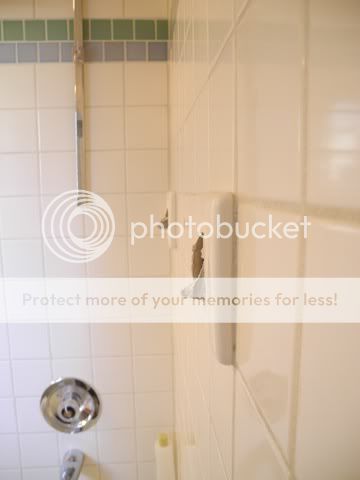
But from the side the gaping holes that were left behind had sharp awful mortar sticking out, just at the right height to scratch the cr@p out of an unsuspecting arm. OUCH!


So in my head I was going to perfectly chip out the broken holder bases that were there, and find exact matching 4.25" square, off white tiles to replace them.
Well the nearest tile shop was a 30 min drive each way, and I didn't feel like spending more money on gas than the tile would be. So I chipped out the bases, and all that extra mortar and tiled in two of our extra Talavera tiles from our master bath renovation.
Tada! Cheap fix! Well actually free fix, since we already had all the supplies.


Okay so they don't match the white, but atleast they go with the existing blue and green border tiles above.


The best part is they don't have dangerous pointy scratchy edges that want to cut you! Yeah!!


So, it was a day of half a$$ed fixes, but I think they turned out just "good 'nuff"


Sunday, January 1, 2012

Twenty twelve

The New Year is here, today is the first day of 2012. Lets hope this warm breezy weather we are having is a sign that this year will hold many pleasant & unexpected events like today.


The first project I would like to share with you is my handmade knitting needle case. I technically made it last year (yesterday) but didn't have the daylight or the energy to take pictures of it till this morning.
It was a total labor of love, and also craziness. It took me FOREVER! Well like 8 hours, that's a really long time and my whole Saturday. But I totally love it and it's extremely practical, plus the cost was minimal....if you don't count the labor :)

I saw this pretty item on Etsy, and quickly pinned it on Pinterest, along with similar cases. I have been in need of a much larger and safer knitting needle case since I started knitting last spring. My old one worked pretty well, but occasionally I had needles slip out and with the price for knitting needles that is just plain unacceptable.

The price tag of $104 with shipping for the large case on Etsy was pretty crazy too (or so I thought). Also I wanted something a bit more custom! Or course. So I headed to the craft store and picked up $20 in fabric & supplies and a button for $6, going into the books as "the most expensive button I've ever bought".

I made my case out of some cedar green linen that I had left over from my pillow project a couple years ago. I used the crinkly texture idea from the etsy seller above, and sewed some organic looking creases in the linen first.


The outside of the case has a very natural feel. The randomly creased leafy green linen, and my favorite part of the whole case, the manzanita branch button handmade by a local artisan. The button is fabulous, super smooth feel to it, but really rustic at the same time.


The inside has a vibrant patterned cotton fabric that I picked up at our local quilting store. Its a fun, unexpected interior that I just fell in love with. The cottons at this store feel amazing, and the iron on fleece that I sandwiched between each layer of fabric holds on to my needles nice and snug.


I made my case extra large. It's interior dimensions, not counting the flaps is, 15" x 24". Total of 19" x 28". I added a velcro pocket to the right to hold my measuring tape and other larger items.
There are 30 pockets for all different needles and a circular needle hanger over to the right.


The case has safety flaps to hold the needles in safe and sound. I numbered the pockets on the white fabric row for organization. The whole case rolls up to about 6" x 15" when closed.


I may be seriously considering making a clutch out of this fabric. I love it! It's my new favorite thing in my knitting bag, and totally practical. Can't wait to show it off in the yarn shops to my fellow yarn snobs!


Related Posts with Thumbnails