Showing posts with label Concrete. Show all posts

Sunday, October 30, 2016

Before and After Bathroom Reno from the Undead blog!


I figured Halloween would be an appropriate time to publish a new blog post. Its been eerily quiet here on the old blog. So this post is like a posting from the beyond the...grave!


A few reasons are to blame for the lack of posts, mainly I don't have time for blogging, although we have had many projects over the years that were blog worthy. I simply post pics on social media keeping loved ones in the loop and using that as my main way to show off our accomplishments. Also Blogger has been really difficult to compose on, it takes way too long, and I just don't like it anymore. I'm sure there is a way to make it more user friendly, but I just don't want to put my time into researching that fix...I've got things to craft.

I did however block out some time for this project. The main reason I've always been pro blogging is it gets the information "out there".  I am always so pleasantly surprised at the good DIY renovation pics you can find online. It gives me inspiration, ideas, and hope that we can DIY this kind of project, and that's HUGE!

So without further gabbing, and for those that clicked beyond the facebook post for more details here is our guest bath renovation, before and after!

On September 12th I text messaged Mr. B at work saying "I think I want to renovate the guest bath" and soon after that text, our 3 year old and I took out the glass shower doors and track, while he was still at work.
It took us just under 6 weeks start to finish, of after work and weekend time to get it all done. A few hiccups as usual, but I'm really happy with the results! We (when I say we I mean Mr. B mostly) did 95% of the work, building, installing, and creating. We hired out a drywall texture guy to spray match the existing texture, and had to hire a bathtub chip repair guy when demo got a bit out of hand, and dinged up the cast iron tub. But other than that it was all us!

Before
Of course I was so excited to start ripping the bathroom apart I forgot to take nice "before" shots, so I apologize for my afterthought messy pics.
1975 original vanity and cabinets.
Tile counter top, in a non offensive white. But you know I like to spice things up more than just white tile.
 

The frosted sliding glass doors had to go, I know they are practical while showering and I prefer them to a curtain for use, but not aesthetically. Someday we might have some frameless clear glass doors installed, but it wasn't in the budget this go around. So the doors were the first to go. Plus look how many towels I had hanging around on that frame, what a mess!!
 

The second thing to go was the lowered soffits above the bathtub, and vanity. For some reason the builders of our home in 1975 , thought it would be a good idea to lower sections of the ceiling, to give our house that cavernous small feeling everyone loves. So Mr. B lifted those sections right up to where they belong. Just as we did when we renovated our master bath.

You can see the studs here showing the area that the ceilings were lowered to, about 12" down.


Here the drywall was replaced above the vanity after the 12" soffit was lifted, waiting for the can lights to be cut back in and re textured.


Then there was a ton of tile demo.

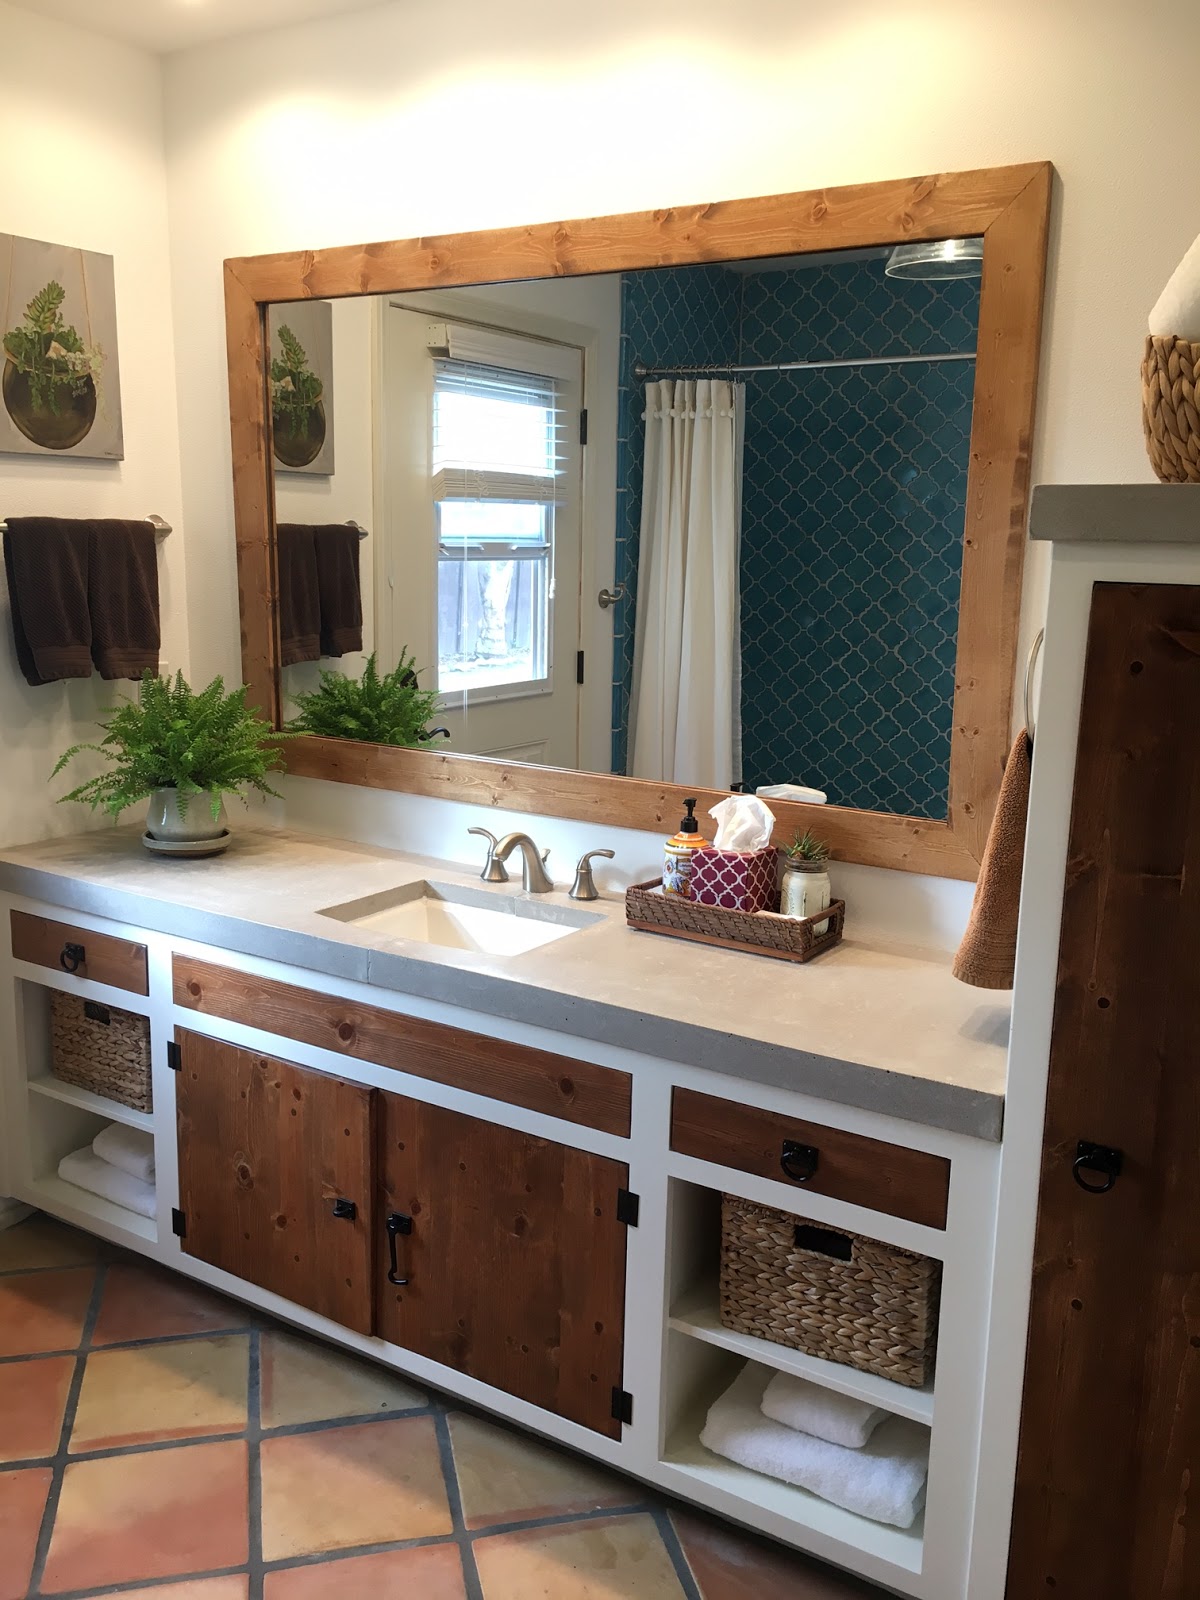
 Mr. B made new doors for the vanity, and a template for the concrete counters. We kept the vanity box, except for the super tall cabinet on the top right, we deleted that one. We filled all the imperfections on the vanity box, sanded, primed and repainted it white. I used a foam roller to simulate a sprayed application and I was pleasantly surprised.

Here are the concrete counters drying out of their molds in the garage. Mr B had made concrete counters in our kitchen, and they were such a nice, affordable, modern, sustainable choice. I really wanted them again.


The beginnings of the tile going up! Super exciting, and a lot more work than all that square 4x4 tile we've laid in the past.

The list of the changes included: 
New cabinet doors, drawers, and drawer boxes built by Mr. B
All new faucets and fixtures, and hardware
New sink
Replace shower door with curtain
Lift ceilings
New lighting
New tile
New mirror, with a frame
Shelving above toilet
Replaced all the shower walls
Re dry walled some walls, and textured
Painted the whole bathroom, and vanity box

So after that long list of things, we got this as our final result. 

After! 


I just realized the under sink cabinet isn't shut or latched, but I'm posting it anyway! ha, that's reason #108 of why I'm not a professional blogger. They do close flush, in case you were wondering :P
You can see in the pic below, where the basket is, there used to be an upper cabinet, we that took out to open the room up even more, and added another concrete counter up there.



Once again before and after.


Thanks for reading! 
Mrs. B

Friday, March 6, 2015

Kitchen Cabinet Reface!

I never blog anymore.. I'm a bad, boring Mrs. B
But in reality I have been doing blog worthy things, just never taking the time to record them on the interwebs anymore.
So here is my attempt at getting our recent remodel permanently out to the world wide web.

Mainly I wanted to post about our very recently completed (today actually was the last day in this month long journey) kitchen cabinet refacing we had done, because when searching for inspiration I couldn't find many blog posts about it. I was nervous to invest time, money, and emotion in a refacing not knowing if it would be enough of a change, and concerned that a complete gut and all new cabinets may have been a better choice, eeek!

Well in the end I am really glad we went with a refacing, it was a huge improvement and a big money saver too! We got to keep our concrete counters that Mr. B built in 2009 before we moved in. 
The cabinets we had in our kitchen I imagine were installed around the late 80's to early 90's, so they were somewhere in the 20-25 year old range, and for particle board, painted cabinets, they had some major wear starting to show. I had thought about just repainting them, but I hated to put that kind of money into a style door I didn't like, and with the doors and hinges that didn't well I decided to go for it.

Here are our before and after photos of the kitchen cabinets. (we also did our laundry and hall cabinets doors to match)

First major change we removed the hanging cabinet above the large peninsula, to give the flow from kitchen to dining room a more open feel.
I love the removal of the hanging cabinets, yes I lost some storage, but those polls holding it up drove me crazy! Good grief, who designed that?


We also had about 4 sections of cabinet doors converted into large drawers, you'll see lots of drawers in this kitchen now, but its a look I wanted and a functionality Mr. B really pushed for. 
Oh we also deleted the two pull out cutting boards, because eew. Those things gross me out, and they killed the clean lines of the cabinets, so bye bye!


The original cabinet boxes all stayed, we removed all the old arched topped doors and drawers, hinges and slides. The remaining boxes patched sanded and were spray primed and painted in Dunn Edwards Swan White in a low sheen finish. 
Worst part about that was the spray primer smell, although our painters did a great job plasticine off the kitchen like a spray booth the smell was super overwhelming for a couple days. We had to camp out at my moms, (thank you mom) and when we came back the smell lingered for a couple weeks!


The style door we picked is a standard "shaker" door. We upgraded all the interior drawer boxes to pre-finished maple, all the interior shelves were remade, and all the hinges and drawer slides are soft closure Blum hardware all hidden. That upgrade really made a huge difference with it feeling like a total new cabinet remodel, for just a bit more cost. I highly recommend that if you are thinking of refacing your cabinets instead of getting all new.


The cup pulls and knobs are by Top Knobs, and I L-O-V-E them!
m1211 cup pull 
m25 knob


I christened our beautiful new kitchen with a marvelous new baked good that I plan to keep in my permanent recipe book.

My mom has a very giving kumquat tree on the property, that always graces us with a bounty of these amazing fruits. I looked up some inspiration online for something to do with them, other than marmalade. I saw a post on kumquat upside down cake! I used my go to recipe from my red and white Better Homes and Garden book, and I subbed out the pineapple for kumquats, increased the brown sugar in the topping a bit to help with the sourness of the fruit. I added a little clove and cardamom to the cake to add a little spice to go with that burst of citrus, so the cake wouldn't get lost, and it was almost too good.


From now on I'll know exactly what to do with all those kumquats, and I will have a beautiful kitchen to cook them in for years to come!

Friday, August 21, 2009

Sealed and ready for wax. First night in new house!


Here we have pictures of the counters from this morning. Rory finished the 3rd coat of sealer late last night and they will be ready today after work for a coat of beeswax and then buffing. I can't wait. You can see a satin finish to the sealer, and a reflection in the counters now that wasn't there before when they were raw.

We spent our first night in the house last night. We woke up to a beautiful back yard view through the french doors of our bedroom. When we were making coffee this morning standing in our kitchen, I looked at Rory and said "We look like real adults now" and I feel like it too. We have an adult sized home now and there's room for normal life. Last night as we brushed our teeth we weren't bumping into each other, we have 2 sinks!
Rory was sad and sentimental about leaving our little old rental, but I wasn't.
This is going to be fun, and exciting.

Sealing the counters.


The counters are installed! We had a few great big guys come over on Wednesday, they helped Rory lift those massive slabs of concrete into place. Yesterday Rory sealed the counters with three coats of sealer, one of the penetrating sealer, and two of the satin finish. Today we will coat them with beeswax and they will be done! Then Rory can permanently install the faucet, caulk the sink, and grout the seam lines.

Thursday, August 13, 2009

Counters....


Rory has been going full throttle on the counters for the last few days. He made all the molds and mixed all the batches in just a couple days. He was in hyper drive! They are now out of the molds and fully drying. They are massive, and looking pretty good. They need some patching and filling and then Rory will polish and seal them, and they should be ready to install. Tomorrow morning we get carpet installed in two of the bedrooms, and then we can start moving in.

Tuesday, July 21, 2009


We have acid stained the concrete counter, and sealed it once. A few more coats of sealant and it is done! I think it looks great in person, a lot better then I thought it would. I have always been a natural stone fan, granite is beautiful and has a great finish. But the concrete has a warmer feel to it, it's rustic and earthy, it almost looks like clay brick from an old mission.
Related Posts with Thumbnails