Saturday, August 28, 2010

Paint = New (to me)

A bit of paint is all somethings need to make them shine again, even if they have never been pretty to begin with, it can help!

I've been looking for a thread holder for my art (& craft & sewing) room. My sewing box is full and I need to utilize some vertical storage. I saw this thread holder at an estate sale 3 weeks ago, it was marked for $8 and it had a missing/broken dowel, so I passed it up. Then yesterday I went to a local charity thrift store and saw it again marked for $4, still too much money for that sad piece of particle board, but I bought it because its for a good cause and I need the storage.


I hit it with like 3 coats of spray paint, apparently particle board loves to drink paint. Then I hot glued on a trim of linen scraps I had left over to help the edge look less hideous. These are all my thread spools, and look how much room I have left to fill it now!


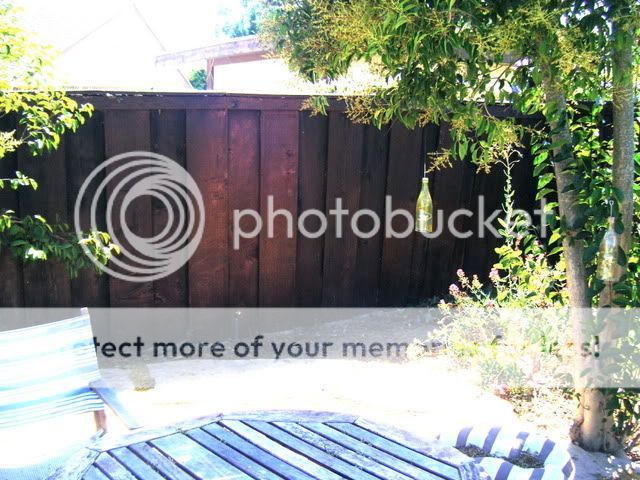
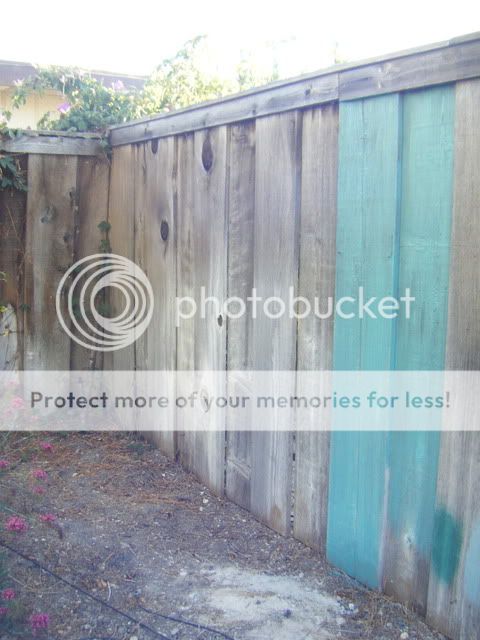
And now for something completely different! The fence. Our fence is an old cedar fence that was here long before we moved in. It is baldy weathered and leans this way and that. You can see through it in spots where the boards are warped, but for now it stays until one day we replace it. So... I thought stain it! Well Paint stain it, its a mixture of paint and stain in one and is semi transparent, just what I needed to cover the variance of colors from this old fence.
Here it is before


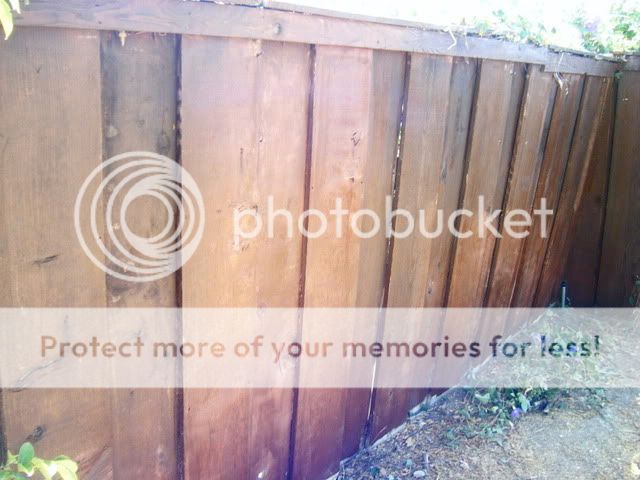
And After! It looks black in this shot but its not, the sun is above and behind it at this point so it looks much darker than it will with the sun on it. But it looks great!
Please excuse the piles of plants and rake in the shot, I am too tired from painting to pick those up till tomorrow. I didn't quite finished the fence either, I ran out of stain and the paint store is closed till Monday, so this project can officially get completed next week.


Here are some closer shots that show the brown a bit more how they appear in real life.


Some of you may know that I was toying with the idea of paint/staining the fence turquoise, okay I actually painted two boards with the sample, and although I loved it in a small amount I knew the entire fence would be too much. I'm glad I went with a neutral color this time.
Turquoise


Mission Brown


Well I'm officially pooped, sunburn and I think I may even order a pizza for delivery! I hope your day was filled with accomplishments or fun!

Thursday, August 26, 2010

I spent it

The gift cards that I won from Domestic Ease! I spent it all today, but only came home with some of the goods. The bigger items were not all in stock, so I'll have to wait for them to be delivered, hopefully that will be soon.

I did bring these two cuties back tonight. I'm very excited to use them, and can't wait till the apples ripen in my dads orchard so I can make a beautiful pie in this Emile Henry large ruffled dish. I love the gorgeous earthy brown. I just might be using it to practice for this years local apple pie contest.
I also got my very own french rolling pin. I've always wanted one of these and have never bought one for whatever reason. It should make rolling many desserts and pastas a dream.


~Thanks again to Domestic Ease for the fab giveaway~

Sunday, August 15, 2010

Zig zag footstool

Remember this little guy?


I scored this cute old little footstool base at an estate sale months ago. I have been wanting to restore it for a while but I couldn't find the right material. I wanted something that would match the ginger jar that Rory got me for my birthday.


While I couldn't find any thing to match, I decided to paint the pattern with fabric paint. Here is the finished stool, it only cost me $5.00 for the wooden stool base, and the cost of the fabric paint, everything else I had from previous projects.


I used the white linen I had leftover from the two cane chairs I finished last month. I practiced on a scrap trying to find the right shade of blue. I printed out a template that I quickly made in photoshop.


The material is slightly see through so I placed the template under it and traced out the zigzag pattern with an embroidery marker that comes off with water. You can barely see the light blue pen mark in the photo but it was very apparent in real life.


I used a nice square firm brush to fill in the lines with the perfect shade of blue. Once the paint dries you just iron the back side of the fabric to set the paint in, then it is waterproof and washable. It is actually great stuff, and was my first time working with it. I used Jacquard Textile Paint, in a mixture of Navy, Sapphire Blue, and Violet.


With the supervision of Rory, I used a skilsaw and cut out a plywood base for the cushion. I pieced together two pieces of 2" upholstery foam that I had from the chair project. Just a bit of spray contact cement to bond them together in the center and to the board.
~That is why I can't throw anything away, you never know when you are going to need it.


A piece of badding goes over the foam and I upholstered the whole thing with a piece of white liner material because the linen is slightly see through.


After I stapled the white liner material on the cushion I laid the zigzag material over the cushion, then pinned the corners so that I could sew a neat corner seam for a fitted look.


Here it is almost done, I trimmed the excess material then stapled to the bottom a piece of black dust cover.


Last minute we decided it would look great with a trim of single welting. I was not hesitant to add that to the project as I was eager to try out my new single welting foot that I bought after my last upholstery project. Let me tell you this foot was worth the $5.00, it made making custom welting a piece of cake!


I hot glued it down to the wooden base, then trimmed around the screw holes.


Then screwed the cushion to the base.


Voila!

Wednesday, August 11, 2010

Rory's Shoulder

So Rory went dirt bike riding on Sunday and had a good day riding for almost the whole day. Then his tire found a rock that threw the bike one way and him the other. He landed on his shoulder then drove himself to the ER to find out he has a type 3 AC separation.

Today we went to the physical therapist for a taping. The Dr. taped him up to relieve some of the weight and hopefully get that shoulder back into a normal position & should help him with the pain. As soon as the fancy tape went on, Rory said it felt so much better. I took photos so we could replicate it on our own, now I just have to find where they sell this awesome stretchy sticky special tape.


If you know where I can find it, let me know!
- Thanks mom! She found it, it's Kinesio Tex Tape.

Sunday, August 8, 2010

Thank you Pottery Barn

I have been scouring Pottery Barn's website lately to see what's new and hopefully find something soon to spend my gift cards on. I didn't find anything to buy just yet, but I had some inspiration for a custom hand towel to put in our new half bath.

Pottery Barn


Mine!


I found a lot of new french ticking material at a garage sale the other weekend and I had the brown linen, which I also used to make the curtain for this bathroom. I made a ruffle and used my fabric pens to draw the "B" on the oval.

Saturday, August 7, 2010

Half bath changes

Today we did a little makeover on our half bath off the laundry room. It's really quite a small bathroom so there wasn't much to change, I just bought a few baskets and hung some art and put out plants.
The big change was the Kohler pedestal sink and Delta faucet I found on Craigslist, we took out the wall mount sink that came with the house.
Before


After


This little shelf came with the place too, and I painted it once already in a bright blue, but white was a little more neutral for the decor I picked out.
Before


After


The 3 framed photos are from my new favorite dessert cookbook from the 1930's here are the images.


I also made a new curtain, because the blue was oh too blue.
Before


After


We changed out the towel ring and toilet paper holder as well.
Before


After


I love the change, even though it's a small one it made a huge difference!
Related Posts with Thumbnails